
Article
ALTRON graph editor: adding, connecting and saving nodes
You want to add a gamma correction to the image path, or put a second recorder next to the display. You do both in the ALTRON graph editor, the Flow Graph Editor that opens from the Tools menu. This editor produces a .dfg file, and the main program reads that file. Here we cover the everyday tasks: adding nodes, connecting them and saving correctly.
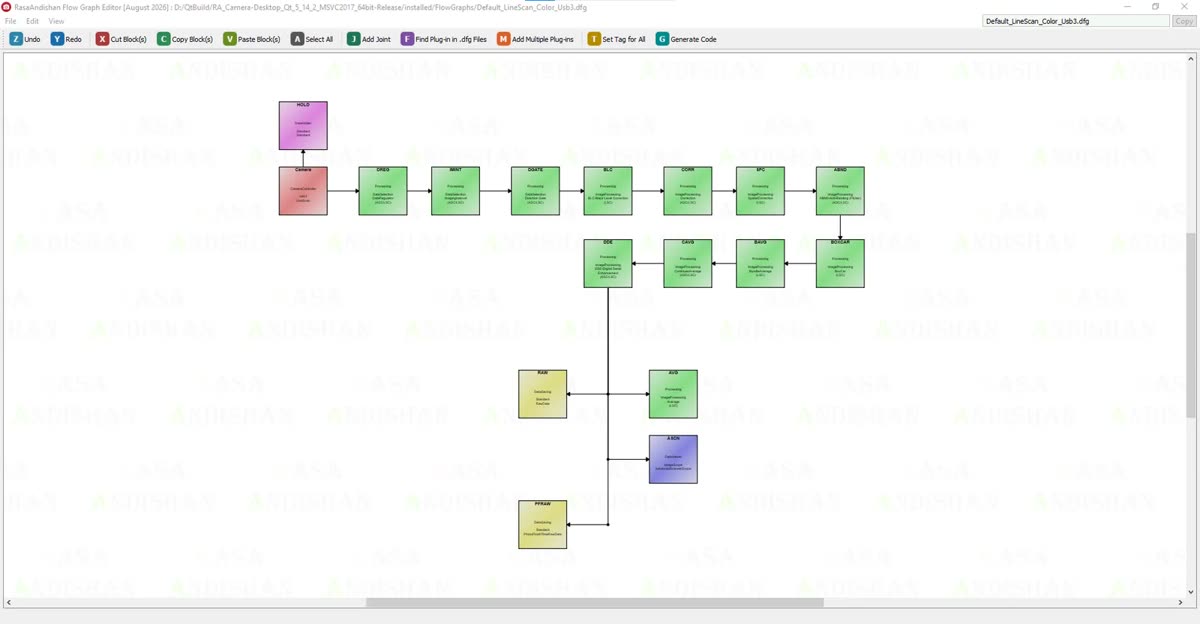
Make a copy before you change anything
The default graphs are in the FlowGraphs folder next to the executable. Before you edit them, make a copy under a new name with File › Save as or Ctrl+Shift+S. This is the simplest way to experiment without worry. If the result isn't good, the previous graph is still there, untouched.
Adding a node from the right-click menu
Right-click an empty spot on the canvas. The menu has an Add submenu for each plug-in family, and inside it the plug-ins are grouped by task. A new node does several things on its own:
- It gets a short, unique name, so you never get two nodes with the same name.
- It lands on the nearest empty spot, not on top of another box.
- It appears selected, with a flashing coloured frame, so you don't lose it in a busy graph.
If you need several plug-ins at once, choose Add Multiple Plug-ins or press Ctrl+M. A categorised tree with checkboxes opens. In a line scan camera graph, the plug-ins meant for area scan cameras are disabled in this list.
The editor enforces two rules as soon as you add a node. Each graph has only one camera, so to change the camera, delete the old node first. Each graph also accepts at most one Debayer node.
Manual wiring with Connect Mode
To draw a wire, tick Connect Mode in the same right-click menu. Now drag from one box and release on the target box. A few points:
- The main output and input ports are chosen automatically, so you don't need to fill them in by hand.
- A duplicate connection between the same two boxes isn't created.
- Some connections aren't allowed. For example, a plug-in that works on raw Bayer mosaic data must come before Debayer. In that case, the Connection not allowed message tells you why and where it belongs.
To move boxes around, untick Connect Mode again. Add Joint (or Ctrl+J) places a bend point on a wire so it doesn't run over boxes. This is purely visual and has no effect on the data. To delete, select a box or wire and press Del.
Automatic connection: two buttons with two different behaviours
The right-click menu has two commands for automatic wiring, and the difference between them matters:
- Auto-Connect Now: It doesn't touch the wires you drew yourself. It does only three things. It connects nodes that don't yet have an input into the chain. It fills empty ports on existing wires. Finally, it lays out the graph neatly.
- Auto-Reconnect All (fix ISP order): It removes the wires between the camera and the processing nodes and rebuilds the processing chain in the correct order. Wires to displays, recorders and Data Holder are left untouched.
The order these commands follow is the golden rule: physical sensor corrections, such as black level and uniformity, must come before cosmetic changes such as gamma and sharpening. In a colour chain Debayer comes first, and in a line scan camera graph it isn't connected at all.
In our experience, it's best to add the nodes first, press Auto-Connect Now once, and then add special branches by hand. If the processing order gets mixed up, Auto-Reconnect All fixes it without breaking the display and recording branches. We explain how to arrange branches in the article on branching in the graph.
Finding a node in a large graph
When a graph gets large, open View › Node List (or press F4). This window shows a text list of the nodes in data-flow order. Before you delete or change a plug-in, use Find Plug-in in .dfg Files with Ctrl+F to see which graphs in the folder use it.
Saving and applying changes
- Save the graph with Save or Ctrl+S.
- Go back to the main ALTRON window and press Recreate All.
- No change takes effect until the chain is rebuilt.
The common mistake is exactly this third step: the graph is saved, but the image is still the old one. Another mistake is working directly on the default graph without a backup copy.
To learn more about node graph architecture, Wikipedia article (English).
To learn about the rest of the software's features, see the ALTRON page. If you've built a graph and aren't sure its order is right, send it to us through contact page and we'll take a look.