
Article
Autofocus in ALTRON: a profile for each lens and lens measurement
You have mounted a line scan camera above a conveyor, out of reach. The product has changed and its surface now sits a little higher. The image has gone slightly soft, and nobody wants to fetch a ladder. ALTRON autofocus is made for moments like this: it moves the motorized lens from inside the software and stops it at the sharpest point.
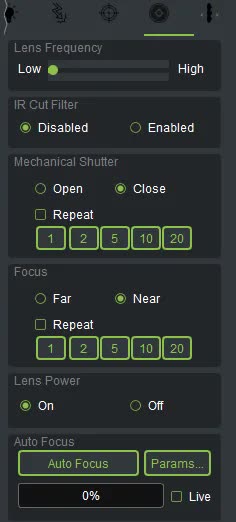
This article covers three things side by side: the Auto Focus button, the per-lens profile and the Measure Lens tool. Measure Lens measures the focus travel of that particular lens, in other words it characterizes the lens.
What exactly does autofocus do?
In the line scan camera panel, the lens control tab has a box called Auto Focus. When you press the Auto Focus button, the lens first travels all the way to the far end (FAR). It then sweeps back, and the sharpness of the live line is measured along the way. At the end, the lens stops at the point that gave the sharpest reading.
Next to the button is a focus quality bar from 0 to 100. Its fill and color show how sharp the current image is compared with the sharpest value seen so far. If you tick Live, the bar follows the image continuously, which also makes it a good guide when you focus by hand.
To stop the search, press the same button again or touch the manual Focus control. This way the operator and the software never fight over the lens.
Why does each lens need its own profile?
No two motorized lenses behave the same. The length of the focus travel, the time the motor needs to settle and the number of commands needed to reach the sharp point all differ from lens to lens. If you use one set of settings for every lens, it works well on one and turns slow or unstable on another.
The Params… button opens the Auto Focus Parameters window. At the top is the Lens profile list with four buttons: Add, Update, Rename and Remove. Each profile has a name and stores the following for that lens:
- Step size for the three stages: travel to the end (Step 1), the return sweep (Step 2) and the fine steps near the peak (Step 3)
- The number of commands in each stage and the pause after each command
- The percentage of the image width used to measure sharpness (Centre region)
- The sharpness measurement method and the lens measurement result
What does Measure Lens measure?
At the bottom of the same window is the Measure this lens now… button. This tool does what you may have done by hand before: it counts how many commands the lens needs to travel from one end of its range to the other. The result appears in the Measured (Measure Lens) row, for example how many command units the focus point is from the far end. This number is saved with that lens's profile.
Keep two points in mind. The measurement is made from the image itself, so put a scene with enough contrast and light in front of the camera. An empty or dark scene gives it nothing to measure. Second, Measure Lens does not find focus; its job is to learn the lens. You can stop a run at any time with the Stop measuring button, and nothing in the settings changes.
Where do you start with a new lens?
- In the lens tab, look at the status label at the bottom. If you see the focus distance in millimeters, the connection to the lens is working. If you see a message such as Lens Power Off or Wrong Lens Frequency, fix that problem first.
- Open Params… and use Add to create a profile named after the lens.
- Put a bright, detailed scene in front of the camera and press Measure this lens now….
- Close the window with OK and run Auto Focus.
- Next time you mount this lens, just select its profile from the list.
Mistakes we see often
- Important detail at the edge of the image: Only the central region is measured, because the object is assumed to be in the middle of the frame. If the part that must be sharp is near the edge of the image, make Centre region larger.
- Noisy image at high gain: In this case even a blurred line can score high, and the search may stop in the wrong place. Raise Noise gate a little.
- Quality bar stuck at zero: This is usually because Peak must rise by is set too high. The same threshold also controls the 0 to 100 bar.
- Outward stage too short: Multiply the number of Step 1 commands by its step size. The result must be larger than the lens's full focus travel; otherwise the lens will not reach the far end.
A tip from our own work
Set the measurement method to Tenengrad, filtered. This is the recommended option, and its result does not shift when the overall scene brightness changes. Keep Normalise ticked as well. If autofocus behaves oddly on a lens, enable Write diagnostics CSV per run. For each run, a CSV file is created in the Log folder next to the program, showing which reading made the final decision.
If you want to read more about the theory behind autofocus, see this Wikipedia article (English) is a good start.
You can find the cameras that support this feature on the line scan cameras page. If you have a question about autofocus or your lens profile, ask us through contact page.