
Article
ALTRON Lens Calculator: focal length and pixel size on the object
One of the most expensive mistakes in machine vision projects is buying the lens first and doing the maths later. The camera goes up, and only then do you find that the full width of the strip doesn't fit in the frame, or that each pixel on the object is so large that small defects are simply invisible. The ALTRON Lens Calculator is built for that moment before you buy.
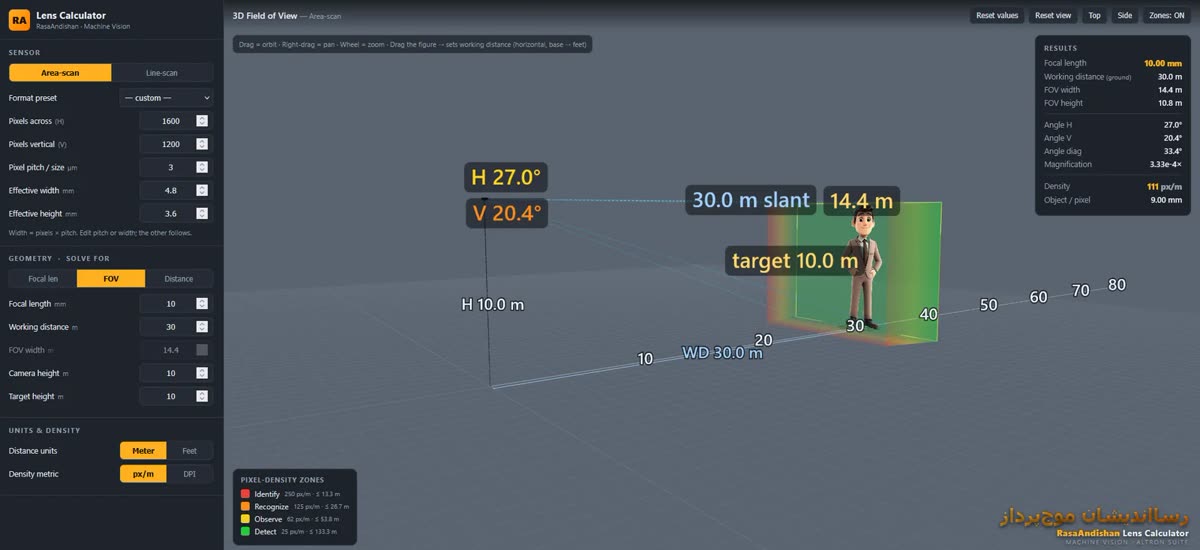
You open the tool from the Tools menu with Lens Calculator…. It installs with ALTRON and opens in your system's default browser. It solves the relationship between sensor, lens and scene, and shows the result in a live 3D view.
Three questions it answers
- With this lens at this distance, how much of the scene fits in the frame?
- What focal length do you need to cover a given width?
- At this distance, how many millimetres does each pixel cover on the object?
The third question is the one people usually forget, and it matters most.
Choosing a lens, step by step
- In the SENSOR section, choose the sensor type: Area-scan or Line-scan. In line scan mode, the vertical dimension is a single row. The results and the 3D view change to match.
- Now enter the sensor specifications. There are three fields: Pixels across (horizontal pixel count), Pixels vertical (vertical pixel count) and Pixel pitch in micrometres. You'll find these numbers in the camera datasheet. If your sensor size isn't listed in Format preset, leave it on custom.
- Set the GEOMETRY · SOLVE FOR switch to Focal len. The field being calculated turns grey and can't be edited.
- In Working distance, enter the actual mounting distance. In FOV width, enter the width you need to see.
- Read the calculated focal length. Lenses on the market come in fixed focal lengths, so pick the one closest to this number. Then switch SOLVE FOR to FOV and enter that lens's focal length to see the real result.
- In the RESULTS table, check the Object / pixel value. Our rule of thumb is that every critical detail should span at least 3 to 5 pixels.
What's in the RESULTS table?
The results are grouped into three sets. Under geometry, you see the focal length, the working distance along the ground, and the width and height of the field of view. The angles group shows the horizontal, vertical and diagonal angles and the magnification. The density group shows pixels per metre of scene and Object / pixel.
The UNITS & DENSITY section has two settings. You can set the length unit to Meter or Feet. You can also choose the pixel density measure: px/m (pixels per metre) or DPI (dots per inch). If you work in surface inspection or printing, choose DPI; most people in those fields find it more familiar.
Take mounting height seriously
The Camera height and Target height fields don't affect the lens formula. But the viewing angle and the slant distance come from these two numbers. When the camera is mounted above the object, the real optical distance is longer than the distance you measured along the ground. Ignoring this difference is a common error. The best way to see the effect is to press the Side button in the 3D view.
A few tips for working with the view
- Drag to rotate the view, right-drag to pan, and use the mouse wheel to zoom.
- You can drag the reference figure along the ground to change the working distance and watch the results update live.
- Reset view only resets the viewing angle. Reset values, however, returns every input to its default and clears your work, so don't confuse the two.
If your application is video surveillance, look at the PIXEL-DENSITY ZONES table instead of Object / pixel. It lists four thresholds: Identify at 250, Recognize at 125, Observe at 62 and Detect at 25 pixels per metre. If you press the Zones button, these zones are coloured on the ground.
Our advice
Don't rely on Format preset alone. The real sensor size is the pixel count multiplied by the pixel pitch, and the tool locks these two together. Enter the exact datasheet values so that Object / pixel is reliable. If you're still choosing between camera models, the camera comparison page puts the specifications you need for this calculation side by side.
If you'd like to read more about the theory behind focal length, this Wikipedia article (English) is a good start.
If you've worked out the final numbers for your project and want someone to double-check them, send us the details through the Contact us page.