
Article
The ALTRON diagnostics panel: actual rate, counters and camera housing temperature
A line-scan camera is mounted over the conveyor and the image appears on the screen. Everything seems fine, but the image looks a little compressed and nobody is sure at what rate the camera is actually running. At a moment like this, the first place we go to is ALTRON’s diagnostics panel, not the camera settings.
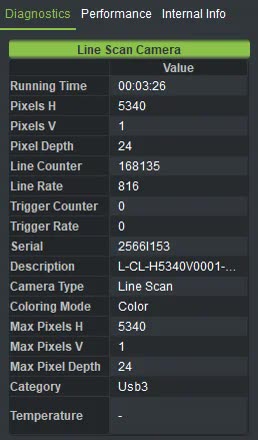
In the main window this panel has three tabs: Diagnostics, Performance and Internal Info. Here we only look at the first tab, the one that shows the camera’s live status.
We go through the rows in the order we check them ourselves when troubleshooting:
The number you enter in Desired Line Rate is a request, not a guarantee. The Exposure Priority Over Fps option is on by default. This means that if the exposure time does not fit in the interval between two lines, the camera keeps the exposure and lowers the line rate.
That is why we always compare the Line Rate in this table with the requested value. If it is lower, either shorten the exposure and add more light, or uncheck Exposure Priority Over Fps. On a line-scan camera this difference shows up directly in the image: when the line rate is not matched to the object’s speed, the image is stretched or compressed in the direction of motion.
When the camera runs on pulses from a sensor or an encoder, Trigger Counter is the installation technician’s best tool:
- In the trigger tab of the camera panel, set Trigger Mode to Hardware Triggering and start acquisition.
- Pass an object in front of the sensor or start the belt.
- Look at Trigger Counter. If it is not going up, check the wiring and Trigger Polarity.
- If the counter is going up but Trigger Rate does not match the encoder speed, look at Trigger Polarity again. For example, Both Edge mode gives two triggers per pulse.
A few seconds spent looking at these two numbers saves hours of unplugging and replugging connectors and swapping cables.
If you have enabled Crop Line, Pixels H is smaller than the full sensor width. This is normal and confirms that the crop has been applied. The quickest way to be sure is to compare Pixels H with Max Pixels H.
The Temperature cell is not just a number. Its background color shows the status: green means the temperature is normal, yellow means it has passed the warning level, and red means it has reached the critical level. In the red state an alarm beep also sounds, so that an operator who is not looking at the screen is alerted too. You set the warning and critical levels yourself in this same panel. If the camera works in a closed enclosure or next to a furnace, this warning alerts you before the camera is damaged.
When something isn't working, it is tempting to go straight to the settings and start changing numbers. We suggest you first spend half a minute on this table. The actual rate, the counters and the data dimensions usually tell you where the problem is. If the signs aren't clear, the next step is the Performance tab.
If you want to read more about the theory behind frame rate, see this Wikipedia article (English) is a good start.
See our line-scan cameras on the line scan cameras page. If the numbers in this panel on your camera do not match what you expect, contact contact page and we'll look into it together.