
Article
Motorized Lens Focus and the Focus Meter on the Line Plot in ALTRON
You have mounted the camera above the production line on a structure that takes a ladder to reach. Every adjustment of the focus ring means climbing up, turning it a little, climbing down and looking at the monitor. With a motorized focus lens, this back-and-forth disappears and focus is adjusted from your desk, inside ALTRON. Here we explain how manual control of motorized lens focus works, and how to find the sharpest point numerically with the focus meter on the line plot.
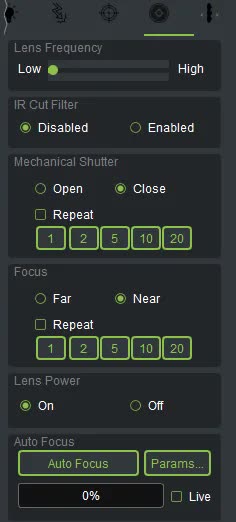
Where is the lens control?
Select the line-scan camera node and go to the Lens tab from the row of icons at the top of the settings panel. The main controls are:
At the bottom of the Lens tab there is always a status label that reads the lens state from the camera itself. It shows either the current focus distance in millimeters, or one of the messages Wrong Lens Frequency, Lens Power Off or Manual Lens. Manual Lens means the installed lens is not motorized. If the buttons have no effect, check this label first.
With a line scan camera, the 2D image is built by stacking lines, and until the object moves you have no meaningful image. The sharpness difference between two small lens steps is also usually too subtle to see on the monitor.
That is why we set focus on the line intensity plot (Line Scope). On the plot, a sharp edge appears as a steep step and a blurred edge as a gentle slope.
When you have a Line Scope in the graph, the Focus Meter option appears in the View menu. Here is how to use it:
- Place a target with sharp, high-contrast edges, such as a black-and-white pattern, in the field of view.
- In Line Scope, hold down Shift and left-click and drag over the range that contains the edges. This range is marked with a green bar on the plot.
- Open the View › Focus Meter window. The focus meter measures each new line only within this range.
- Move the lens in large steps, for example 10 or 20, until the focus meter reading improves. The focus meter shows the current sharpness relative to the best value it has seen so far.
- Now move back and forth around the best point in steps of 1 and 2. When you pass the peak and the reading gets worse, go back one or two steps.
The focus meter averages over several lines and estimates noise from line-to-line differences. That is why it only counts new lines. So the camera must be capturing; if no new lines arrive, the focus meter has nothing to measure.
- Set the exposure first. If the peaks of the plot are pressed against the top, the edges get flattened and clipped, and the sharpness comparison becomes misleading.
- Place the focus meter range where the main object actually is. With some lenses, the center and edges of the field of view do not come into focus at the same point.
- If you haven't found the approximate focus range yet, start with large steps. Keep steps 1 and 2 for the final adjustment.
For places where focus needs to be checked regularly, the same tab also has an Auto Focus option, which we cover in a separate article. You can also see the specifications of our line scan cameras See us on their page too.
A short general reference on focus in optics: Wikipedia (English).
If you are unsure about choosing a motorized lens for your installation, ask our team.