
Article
The Three Trigger Modes in ALTRON and Choosing Signal Edge or Level
Exactly when does your camera capture an image? On a lab bench this may not matter. On a production line, where a part is under the camera for only an instant, everything depends on it. In ALTRON you make this choice with the trigger mode, which is in the Trigger tab of the camera panel.
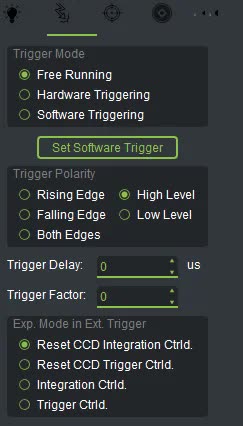
Free Running: the camera sets its own pace
This is the default mode. The camera waits for no signal and captures images continuously. A line scan camera runs at its Desired Line Rate, and an area scan camera at its own frame rate. If you only want to view the live image or adjust exposure and focus, this mode is enough. It also works anywhere synchronization with the object does not matter.
In this mode the camera captures an image only when a command arrives from the software, that is, from the Set Software Trigger button or the equivalent SDK command. This mode is very useful for testing. You can use it to grab single frames or to test the trigger path before wiring.
This is the standard mode on industrial lines. Each image is captured on an electrical pulse at the camera's trigger input, for example a pulse from a photoelectric sensor or an encoder. Three settings determine how this mode behaves: Trigger Polarity, Trigger Delay and Trigger Factor. We cover Trigger Delay and Trigger Factor in the next part. Here we only look at Trigger Polarity.
This option defines which part of the signal counts as a trigger:
The right choice depends on the output of the sensor or encoder connected to the input. If each pulse should produce exactly one image, one of the two edges is usually the more natural choice. If you set the wrong direction, the camera either does not trigger at all or runs at half the frequency.
Line scan cameras have one more option next to these: Exp. Mode in Ext. Trigger. The default is Reset CCD Integration Ctrld. In this mode each trigger resets the sensor integration, and the exposure length is the value you set in the software. If you choose Reset CCD Trigger Ctrld., the exposure length is set by the width of the pulse itself. The Integration Ctrld. and Trigger Ctrld. options behave the same way, just without the reset.
If the image is too bright or too dark only in external trigger mode, this option is usually the cause.
- First, in Software Triggering mode, press Set Software Trigger a few times and make sure the image reaches the display.
- At the top of the camera panel, press Rst Trig Counts so the trigger counter starts from zero.
- Set the mode to Hardware Triggering, and set the polarity to match the sensor.
- Send a few pulses and check the Trigger Counter value in the Diagnostics tab.
- If the counter does not increase, there is a problem with the wiring or the Trigger Polarity.
- Compare Trigger Rate with the actual pulse rate. If Trigger Rate is half the actual rate, you may need Both Edges. It is also possible that Trigger Factor is set incorrectly.
If your camera has a pan-tilt head, keep an eye on the PTZ tab. If you select any mode there other than Photo Finish, the camera automatically switches to Hardware Triggering and Rising Edge. Photo Finish mode returns the camera to Free Running. So if the trigger mode changes by itself, check that tab first.
These settings are almost the same across our line scan cameras and area scan cameras.
To learn more about signal edges, Wikipedia article (English).
If you are not sure which polarity matches your line sensor's output, send us its specifications through contact page.