
Article
Black Level and Separate Red, Green and Blue Adjustment in ALTRON
We follow a simple rule when setting up any industrial camera: black first, then color. When the blacks in the image look slightly gray and the contrast looks flat, it is tempting to raise the contrast or gamma. But the root of the problem is usually the black level, and until it is fixed, every later color adjustment sits on a skewed base.
What is black level, and why does it drift?
A sensor does not output zero even in total darkness. It has an electronic offset that shifts with exposure, gain and temperature. If this offset is not corrected, blacks turn gray, contrast drops, and every later measurement is biased.
There is one more point that matters for calibration: the camera applies the offset before the gain stage. So every time you change the gain, the black level shifts with it.
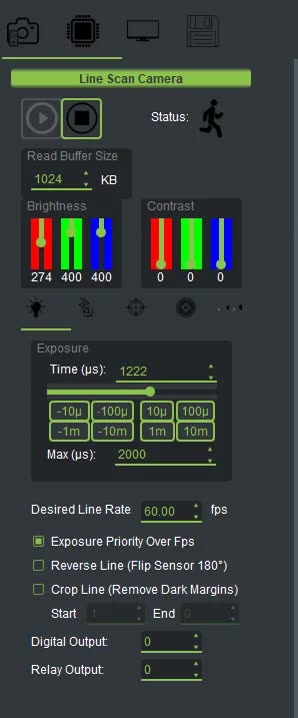
In the line scan cameras panel, each color channel has two separate sliders:
Both groups are saved with the camera settings and sent to the camera again on every Start. When automatic calibration runs, these same sliders move, so you can always see what the calibration did. Keep manual changes for fine-tuning.
You will find the Black Level Correction, or BLC, plug-in in the graph after the camera. Its settings:
The Activate/DeActive switch runs the calibration. First the program asks you to put the lens cap on. Then it adjusts the Brightness of each channel until the dark level sits on the Pedestal. If the switch is green, a black level has been applied. If it is red, no level has been applied.
The same BLC panel has an Auto White Balance section. If you check Set Analog Gain First, the full calibration runs in four steps, and before each step a window tells you what to do:
- Put the lens cap on. The black level is measured with the gains at zero.
- Take the cap off. The gains are raised until the brightest color reaches 90 percent of full scale, and the other colors are matched to it. Put the scene in front of the camera under the same lighting it has in real operation. You do not need a white sheet; the balance is done on the gray and white areas of the scene itself.
- Cap on again: the black level is measured again at the new gain.
- Cap off: the balance is set once more, and you are done.
Take step three seriously. If you skip it, the dark end of the image is still set for the old gain.
In the area scan camera panel you have an overall Brightness and Contrast, plus the Black Level group. With Auto checked, the camera calibrates the black level itself. If you leave it unchecked, you set the offset yourself with a slider from 0 to 1023. If the blacks are clipped to absolute black, raise the slider. If they look gray, lower it.
- Running black calibration while light leaks in around the lens cap.
- Changing the gain after calibration without measuring the black level again.
- Setting the Pedestal to zero to make the image look blacker.
Do not forget the correct order either: first set the exposure so that nothing saturates, then move on to these settings.
A short general reference on image sensors: Wikipedia (English).
If you still see a color cast or gray blacks after calibration, get in touch with us through contact form.