
Article
Exposure time and line rate in ALTRON: which takes priority?
The image of the conveyor belt is dark. You increase the exposure time and the image gets brighter. But now the parts look shorter than they really are in the direction of motion. What happened? The answer lies in the relationship between exposure and line rate. Part of the answer is also a small checkbox in the camera panel.
Two numbers tied together
In a line scan camera, the line rate says how many lines are captured per second. Each line must also be exposed within its own time slot. For example, if you want 1000 lines per second, each line has at most about 1000 microseconds. Now if you set the exposure to 1500 microseconds, the two don't fit and one of them has to give way.
In an area scan camera, the same logic applies to the frame rate. There, the resolution, the AOI region and the interface speed also affect the achievable rate.
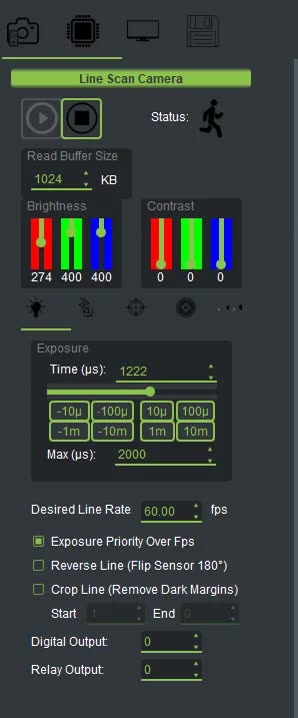
Select the camera node and go to the exposure tab in the right-hand panel:
By default, Exposure Priority Over Fps is on. In this mode, the exposure stays as it is and the line rate drops instead. When it is off, the line rate is kept and the exposure is shortened.
Which should you choose? It depends on your application:
- On a conveyor belt with line scan, image geometry matters more. If the line rate drops, the object is compressed in the direction of motion. It is usually better to clear the checkbox and make up for the lack of light with better lighting.
- For jobs where the object is stationary, or where the quality of each frame matters more than the number of frames, keeping the checkbox on makes more sense.
One note about the PTZ tab: if you select one of the Speed, Position or Scan modes, Exposure Priority Over Fps is turned on automatically.
The Desired value is only your request. Check the actual rate in the Diagnostics tab in the left column. The Line Rate field shows the current rate. If this value is lower than the rate you requested, there are two possible reasons: either the exposure doesn't fit, or another part of the system is falling behind.
- Open the Line Scope plot and turn off Auto Scale to Content so the scale stays fixed.
- Set the exposure time so the peaks don't touch the top of the plot, but also don't fall below half its height.
- Match Desired Line Rate to the belt speed. If the image is stretched in the direction of motion, the line rate is too high and you need to lower it. If the image is compressed, raise the rate.
- In the Diagnostics tab, compare the Line Rate value with the requested rate.
- If these two values differ, decide whether exposure or rate takes priority. Then set the Exposure Priority Over Fps checkbox to match that decision.
In the area scan camera panel you see the Auto Exposure/Contrast group. If you check Auto, the camera changes the exposure itself until the brightness reaches Desired Intensity. This change only happens between the AE Min Exposure Time and AE Max Exposure Time limits. The Auto DG option turns on automatic digital gain. Use it when the exposure has reached its maximum and the image is still dark. Remember that digital gain amplifies noise too.
- Making up for a dark image with gain instead of exposure or light. But gain amplifies noise along with the signal.
- Leaving exposure priority on for a moving line, then wondering why the part dimensions in the image come out wrong.
You can find a more general explanation of exposure in imaging on Wikipedia (English).
If you need help reaching the right rate and exposure on your own line, send us your line's details through the contact form.